Installation & Setup
Theme Download
First of all, we would like to say thank you for choosing us!
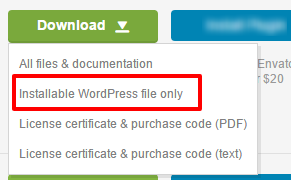
To get the theme's files you need to:
- Navigate to the section in your Envato account (where all your purchases are stored).
- Click the green Download button.
- Click "Installable WordPress file only" to download the theme.
Upload and Activate the Theme
Extract theme package to local folder downloaded from ThemeForest.
Navigate to Themes Page.

Click "Add New" button.

Click "Upload Theme" button.
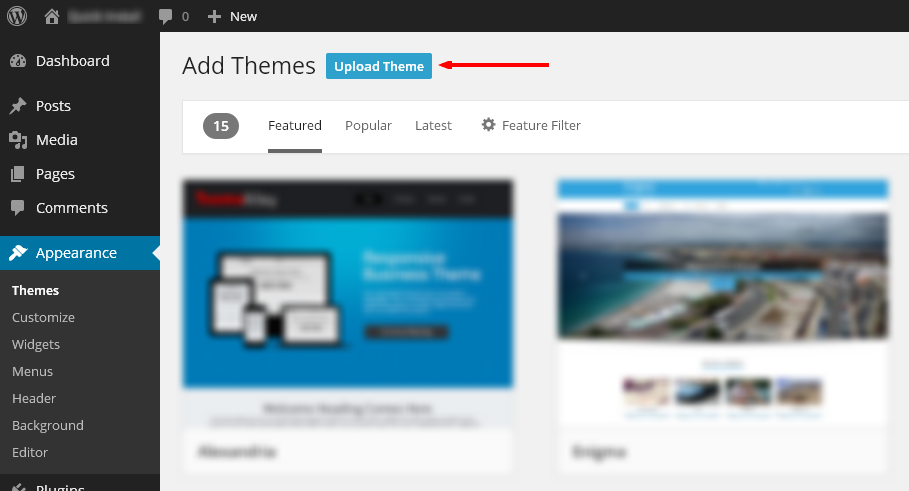
Click "Choose File" button, navigate to local folder with extracted archive files and pick amory.zip. Then click "Install Now".

Click "Activate" once the upload has finished.
Troubleshooting
If you are having troubles with theme upload, please try to follow next steps:
- Extract downloaded theme archive package to some local folder.
- Navigate to this folder and find subfolder "amory" (it is folder with theme files).
- Copy it to
/wp-content/themes/folder of your web server. - From your Admin Dashboard navigate to Appearance → Themes and activate the theme.
Plugin Installation
We suggest you to start the installation of recommended plugins, after the theme was activated.
1. Click "Begin installing plugins" and select the plugins you need to install from the list.

2. Choose all plugins (by clicking Plugin checkbox) choose Install action from select box and click Apply.
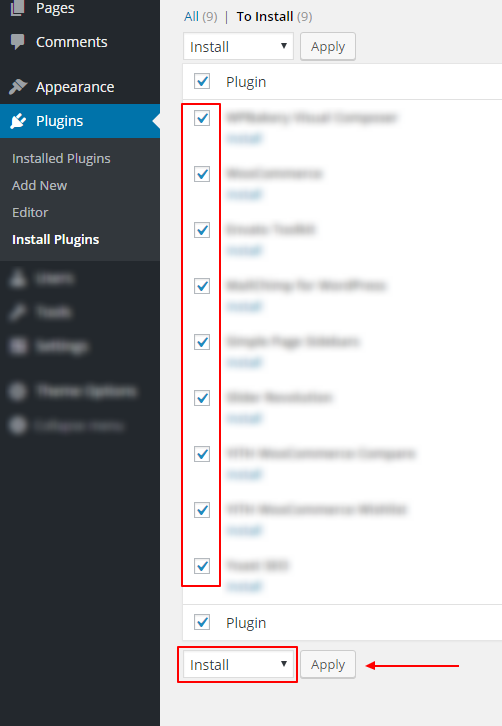
3. Activate the Plugins you just installed (If haven't been activated during installation).
Troubleshooting
If you are having troubles with activation of "WordPress Importer v2" (see error notice), please check that you don't have any other activated import plugins such as "One Click Demo Import" or "WordPress Importer". Only following import plugins should be activated: "WordPress Importer v2", "Wordpress Importer Plugin Extension | SH Themes".
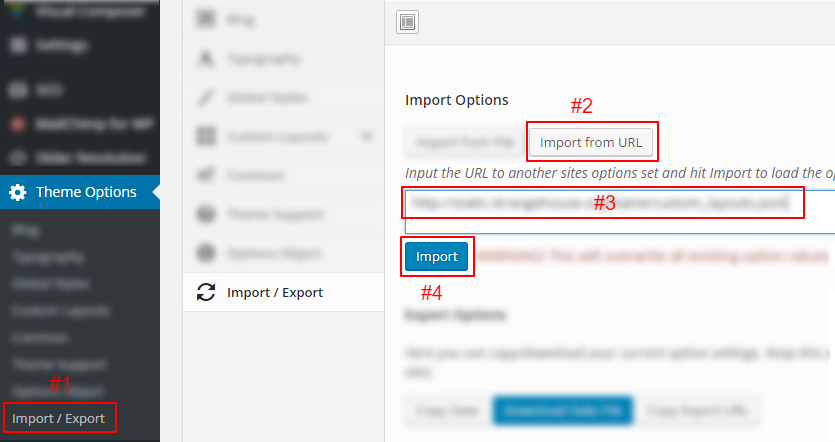
Custom Layouts Import
This step is optional. If you don't want to import custom layouts "like seen in the demo" you can skip this step.
- From admin Dashboard navigate to Theme Options → Import / Export
- Click Import form URL
- Copy and paste:
- Click Import (try to click twice if nothing is happening after single click)
Revolution Silder Import
This step is optional. If you don't want to import custom Revolution Sliders "like seen in the demo" you can skip this step.
- From admin Dashboard navigate to Slider Revolution
- Click Import Slider
- Choose slider archive (each archive is single slider) from {extracted archive folder}/import/revolution-slider/
- Click Import Slider
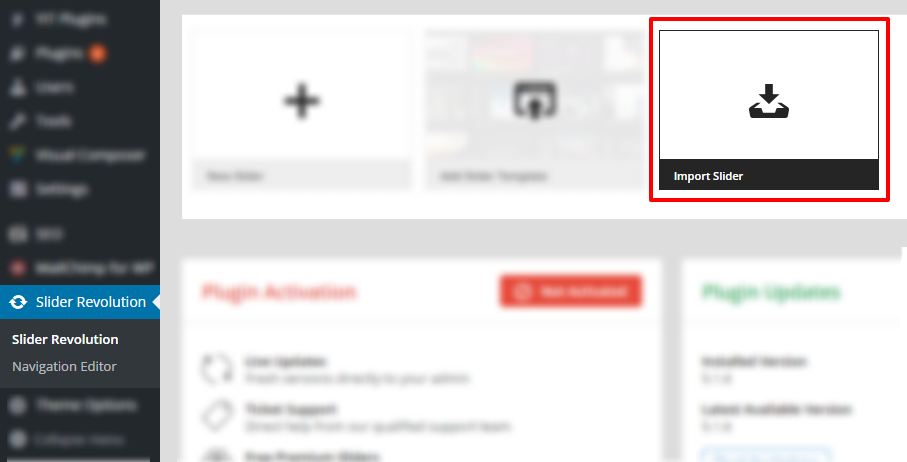
You need to make this actions for each slide individually.
Demo Content Import
This step is optional. If you don't want to import post products and pages "like seen in the demo" you can skip this step. We've included the demo content (pages, products, etc.) to help you get started with creating your website.
Navigate to WordPress import page.
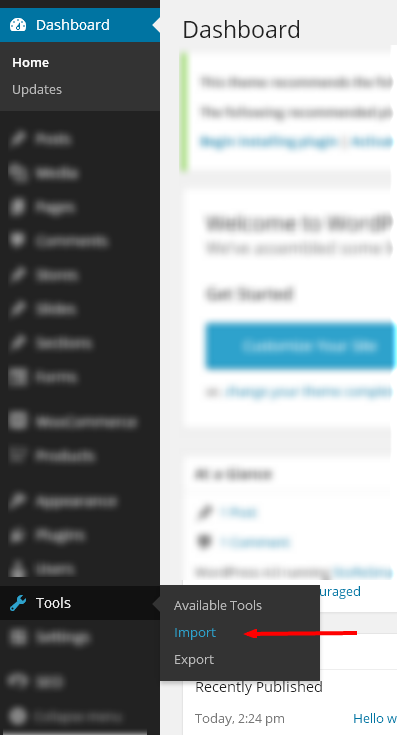
Click "Wordpress" link.

For uploading, choose your extracted theme folder /import/demo_content.txt.
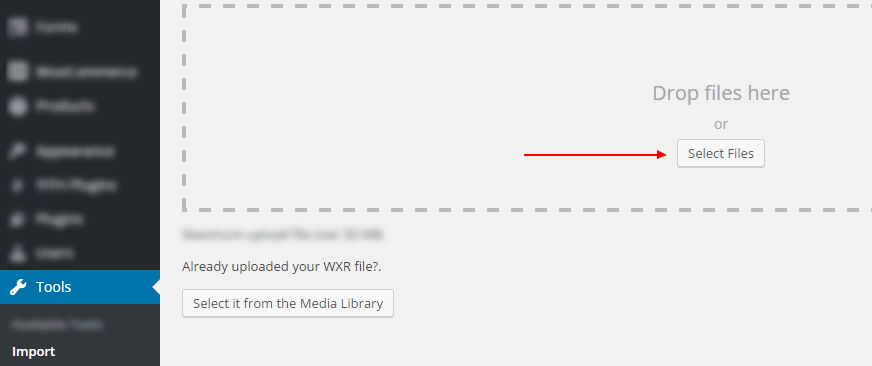
Then click Start Import button.
- Assign posts to your user.
- Check Download and import file attachments checkbox
- Click Start Importing button
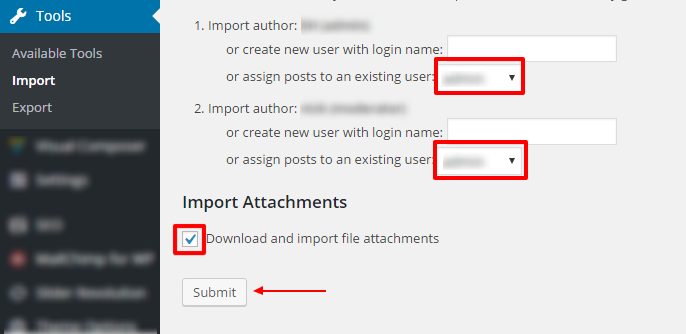
Please be patient. Do not pay attention on percentage. In some cases 100% percent can not be reached. Wait until you will see message: "Import Complete!".

Pages Setup
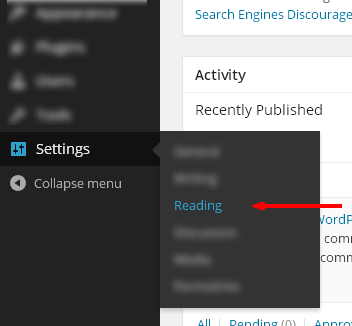
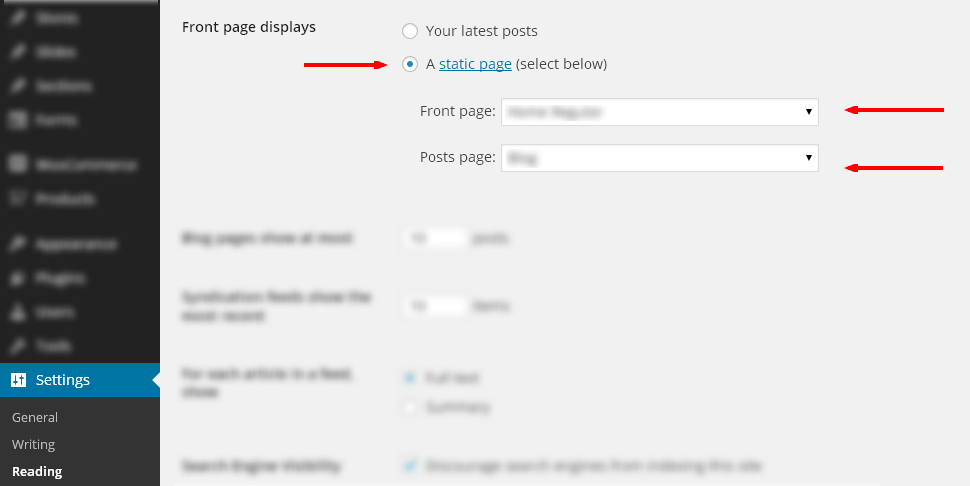
To set one of the pages available as the front page for your site, navigate to the Reading section of Settings tab.
Select "static page", choose (after you've made demo content import or you have added new pages manually):
- Front page amory – Responsive Clean WordPress Theme
- Posts Page (no title)
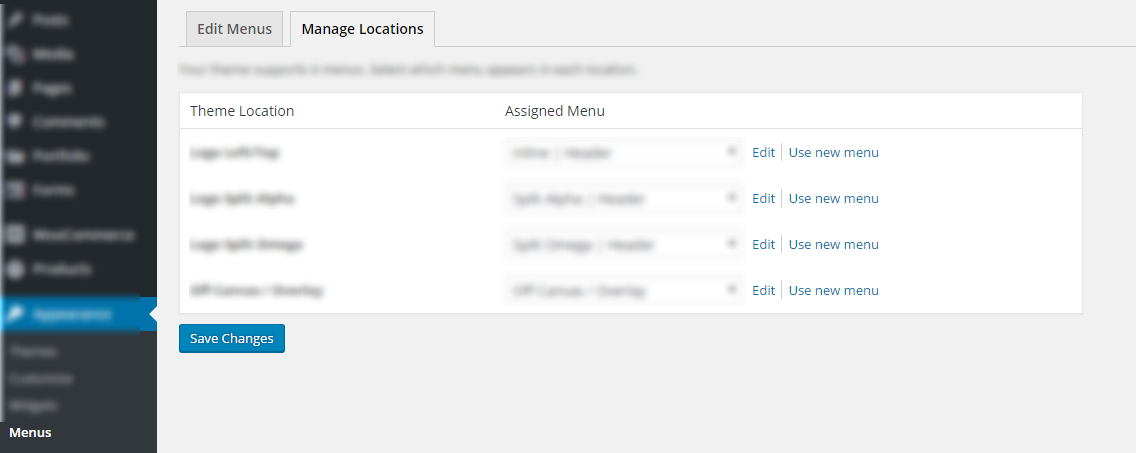
Manage Menu Locations
From admin Dashboard navigate to Appearance → Menus
Also you can assign menu to locations in Manage Locations section.
- Logo Left/Top - Inline | Header (header layout set to logo left or logo top )
- Logo Split Alpha - Split Alpha (header layout set to logo split, on left from logo)
- Logo Split Omega - Split Omega (header layout set to logo split, on right from logo)
- Off Canvas / Overlay - Off Canvas / Overlay (off canvas side and overlay menu)
See custom layouts / header variants for more info.
General Guidelines
Custom Logo and Favicon
Logo Setup
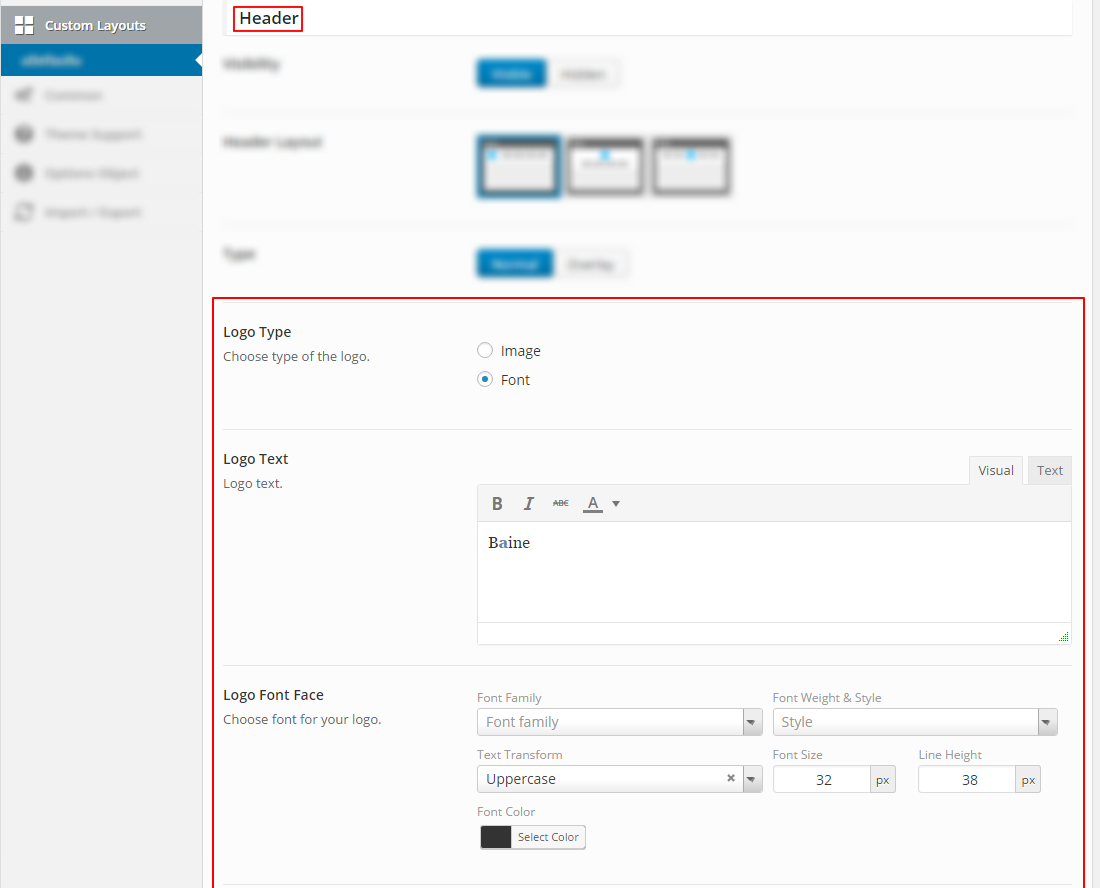
From admin Dashboard navigate to Theme Options → Custom Layouts
- Select custom layout (you need to set your custom logo for each custom layout)
- Find Header section.
- Chose Logo Type (Image or Text)
- Set your logo text parameters or upload logo image.
Proceed with alternative (sticky header) logo setup.
Favicon Setup
From admin Dashboard navigate to Appearance → Customize

- Click Site Identity.
- Click Select Image under Site Icon section.

Custom Layouts
Adding Page Custom Layout
From admin Dashboard navigate to Theme Options → Custom Layouts

Managing Custom Layout
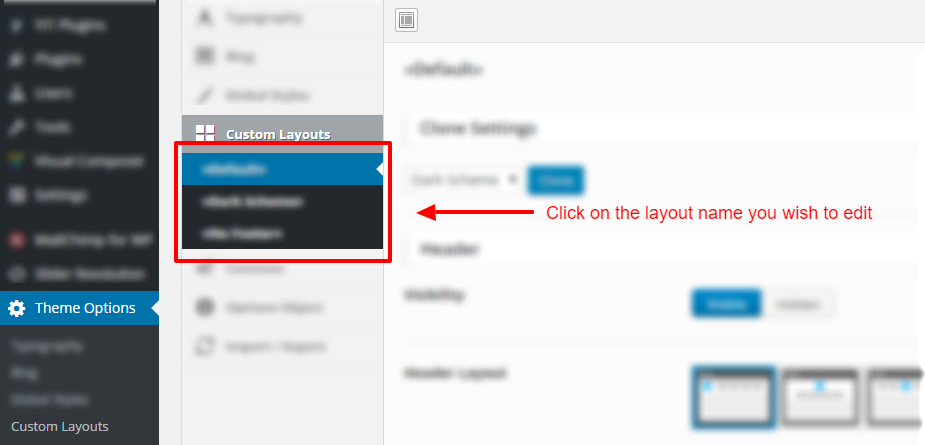
Clone Settings
You can clone settings from other layout.
Header
Visibility
Show/Hide header.
Header Layout
Choose header layout. (Logo on left / Logo above the navigation menu / Split navigation menu logo).
Type
Overlay / Normal header. If you want header to cover some element ( e.g. slider) you need to choose "Overlay" option.
Logo Type
Navigation Menus
Classic Navigation Menu
Turn on/off inline navigation menu (classic menu) with drop-downs.
Alternative Navigation Menu Type
- Overlay
Show overlay navigation.
- Off Canvas
Show off canvas navigation instead.

Position
Can appear on the left/right side of the page.
Content Area
Layout
Page sidebar position / disabled sidebar.
Bottom Area
Show Bottom Widget Area
Dashboard -> Appearance -> Widgets. "Bottom" widget area is place for your footer widgets.
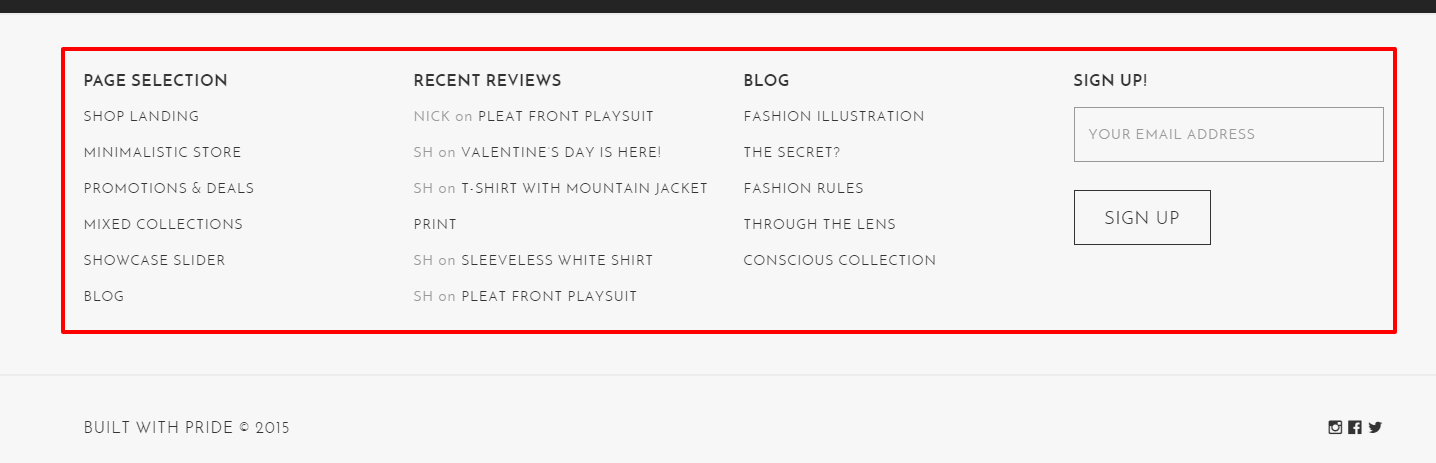
Show Bottom Line

Bottom Line Content
Colors
Header Top Padding
In pixels.
Header Bottom Padding
In pixels.
Sticky Header Top Padding
In pixels.
Sticky Header Bottom Padding
In pixels.
Header Background
Header element background color.
Main Header Text
Header primary text color.
Sticky Header Background
Sticky header element background color.
Main Sticky Header Text
Sticky header primary text color.
Dropdown Menu Background
Background color of header dropdown menu.
Dropdown Menu Text
Primary text color of header dropdown menu.
Primary Dropdown Menu Button
Background color of primary dropdown menu button (mini shopping cart primary button).
Secondary Dropdown Menu Button
Background color of secondary dropdown menu button (mini shopping cart secondary button).
Overlay Nav Background
Overlay Navigation menu background color.
Overlay Nav Text
Overlay Navigation menu text color.
Text
Primary text color.
Important Text
Primary importance elements text color.
Icons
Icons color.
Primary Button Background
Primary buttons background color.
Secondary Button
Secondary button color.
Subtracted Elements
Popup subtracted elements color. Subtracted - shape cut (e.g. social icon shape inside round).

Contrast Blocks Background
Background color of contrast block (e.g. related products section on single product page).
Body Background
Website background color.
Body Background Image
Website background image.
Global Styles
From admin Dashboard navigate to Theme Options → Global Styles

Popups -Product Quick View, Product Compare List, Image Lightbox.
Popup Text #1
Popup primary text color.
Popup Text #2
Popup secondary text color.
Popup Important Text #1
Popup primary importance elements text color.
Popup Important Text #2
Popup secondary importance elements text color.
Popup Icons
Popup icons color.
Popup Icons Hover
Popup hover icons color.
Popup Buttons
Popup buttons color.
Popup Subtracted Elements
Popup subtracted elements color. Subtracted - shape cut (e.g. social icon shape inside round).
Popup Background Color
Background color of popup element.
Text Selection Color
Override the default text selection color
Text Selection Background
Override the default text selection background color
Blog
From admin Dashboard navigate to Theme Options → Blog
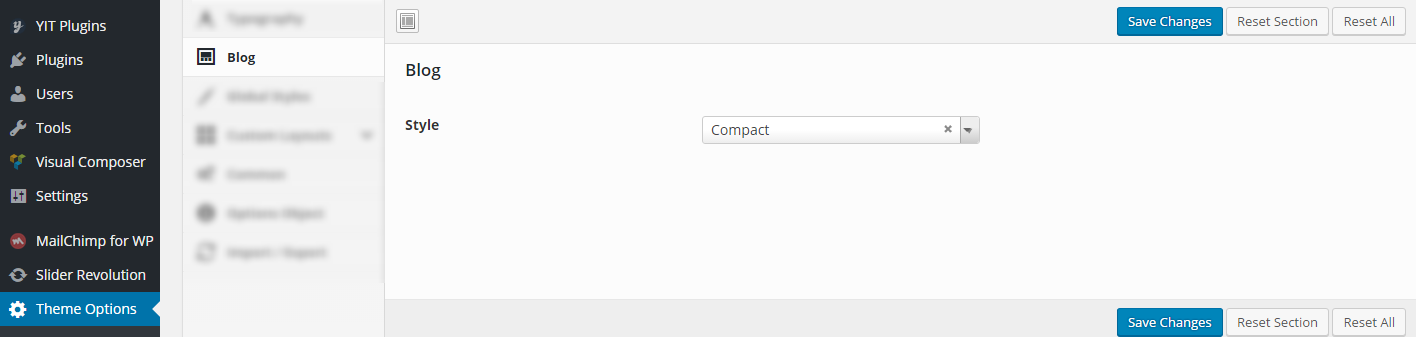
- Regular
- Masonry
Portfolio
From admin Dashboard navigate to Theme Options → Portfolio
Item Back Button Page
Here you can select url to portfolio "go back" button. You can see the button on each single portfolio item page (after content block).
Common
From admin Dashboard navigate to Theme Options → Common

Dribbble Access Token
For more info please see this article.
Custom Javascript
You can use this field for your custom javascript code.
Custom CSS
You can use this field for your custom css.
Typography / Custom Fonts
From admin Dashboard navigate to Theme Options → Typography

Font Source
You can use fonts from different sources
Google Fonts
Fonts from Google Hundreds of free, open-source fonts optimized for the web.
Custom Font
Custom Link to css file with defined fonts.
Adobe Typekit
You can use fonts from you Adobe Typekit Account. You just need specify your Typekit Kit ID below.
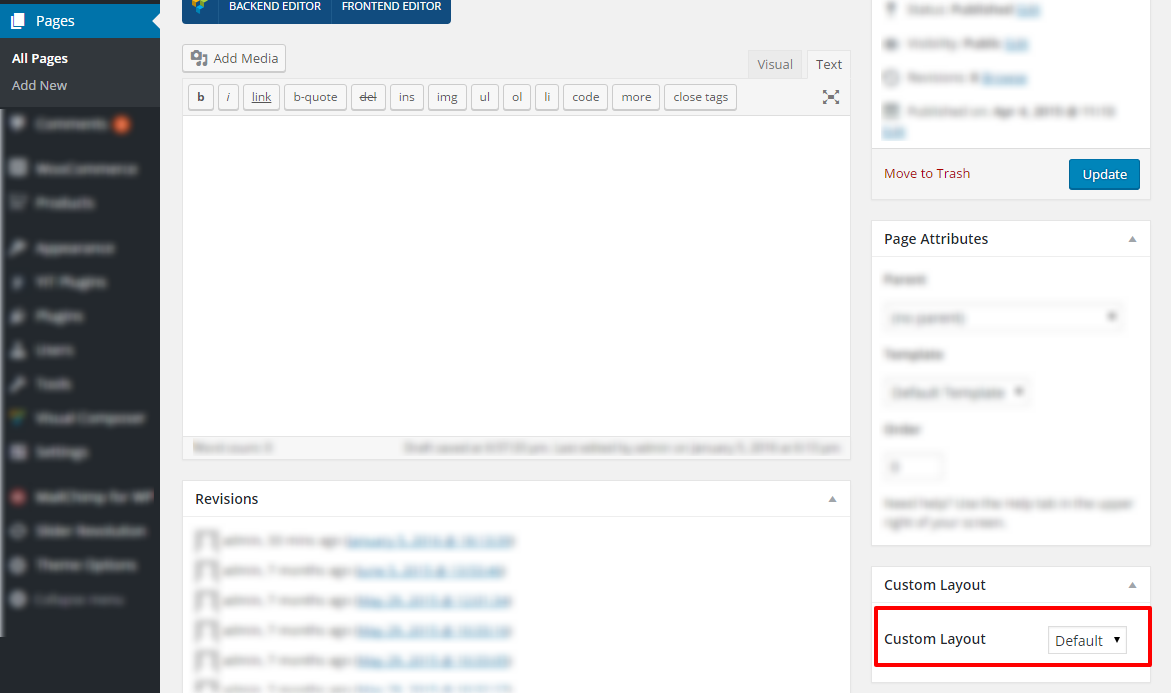
Applying Custom Layout (Page / Post / Product / etc.)
To set Page Custom Layout:
- From admin Dashboard navigate to Pages/Posts/Products/etc. → All Pages/All Posts/All Products.
- Find required and click Edit.
- Select desired Custom Layout from select box (see the screenshot below).
Related Articles
Navigation Menu Creation
From admin Dashboard navigate to Appearance → Menus

Give a name to your menu and click "Create Menu".

Setup Navigation Menu
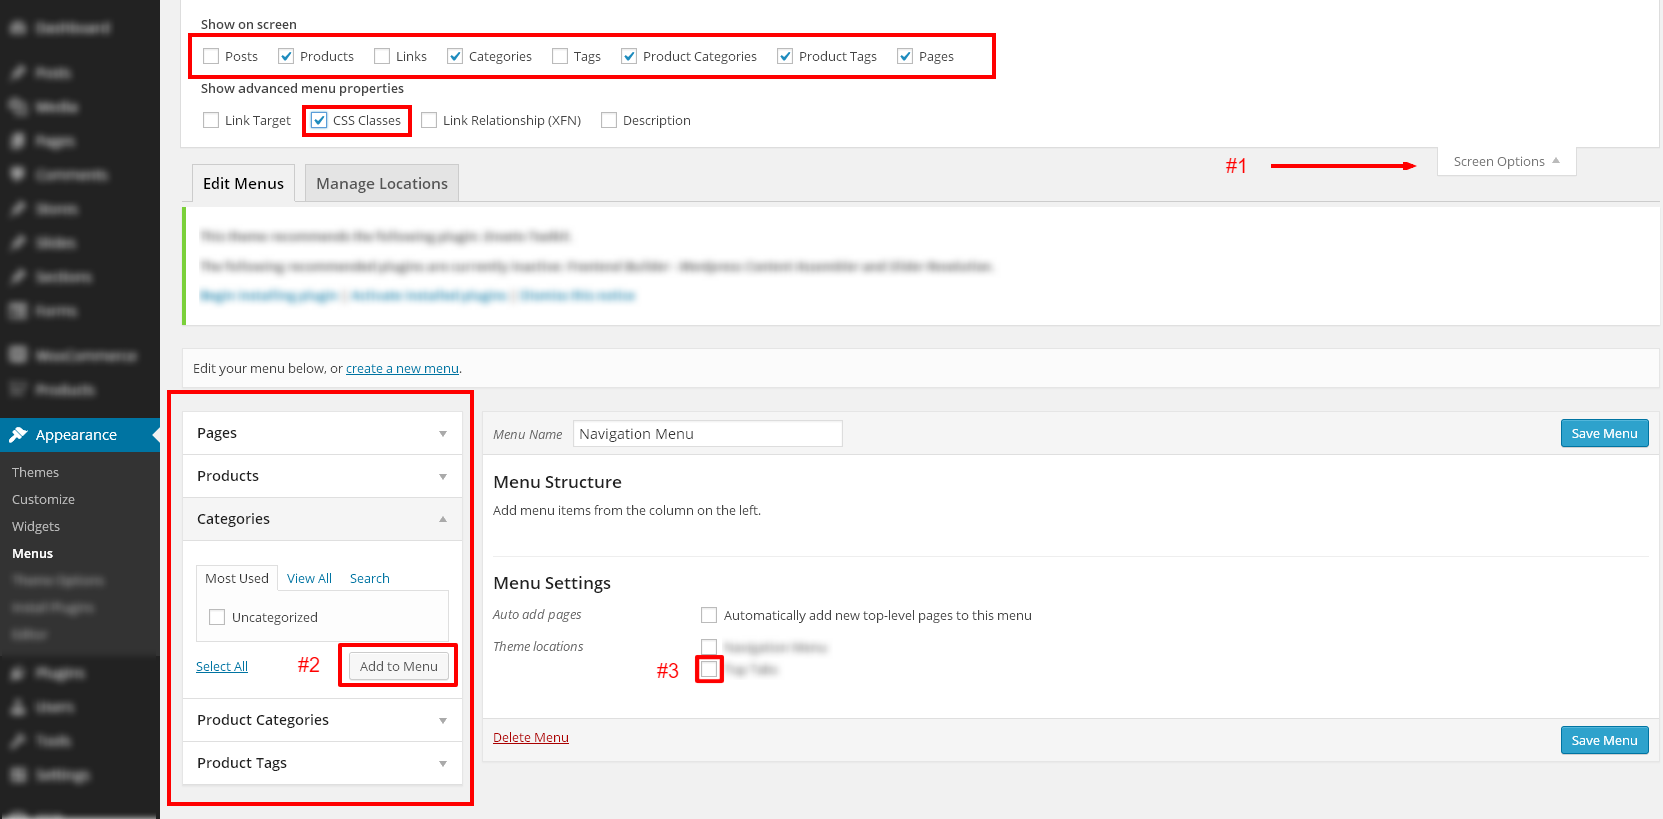
#1 - Configure "Edit Menus" Page. (Add "CSS Classes" fields. You can also add other fields like Description").
#2 - Add items to menu from items column.
#3 - Assign your menus to locations.
Main Navigation Menu
☀ First you need to create new menu.
Types of Nav Menus
1. single column menu
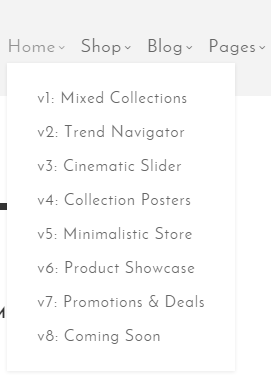
2. multi column menu ("Mega" menu)

Creating menu
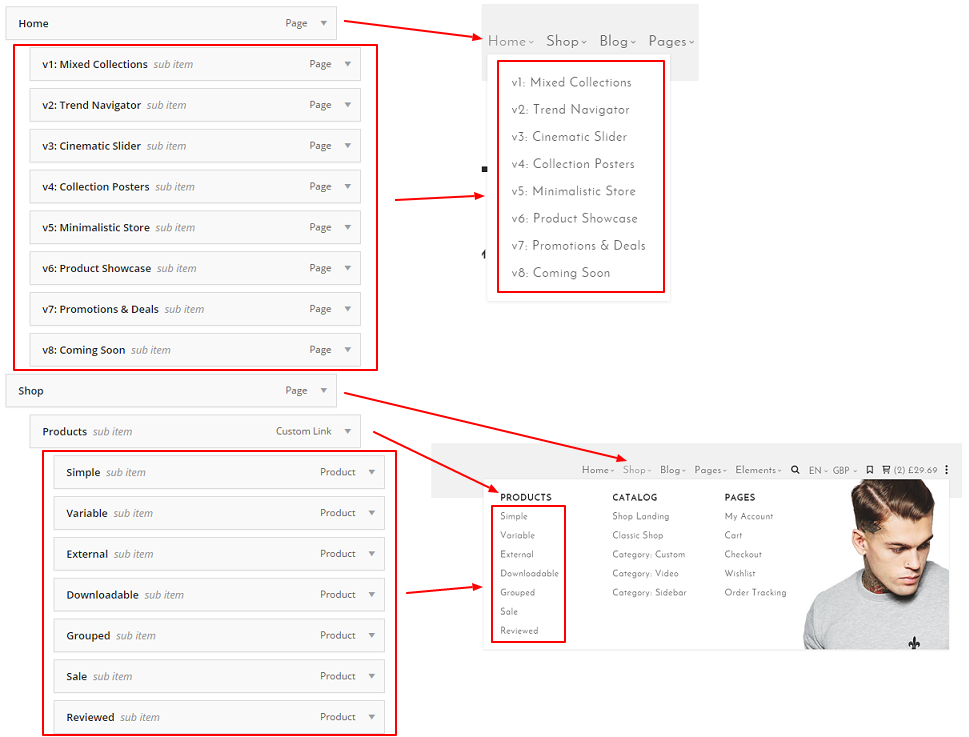
Menu structure:
- first level - link
- second level - column name or link
third level - link (optional)
Ability to add menu css classes
Select "css classes" checkbox inside "screen options" tab.

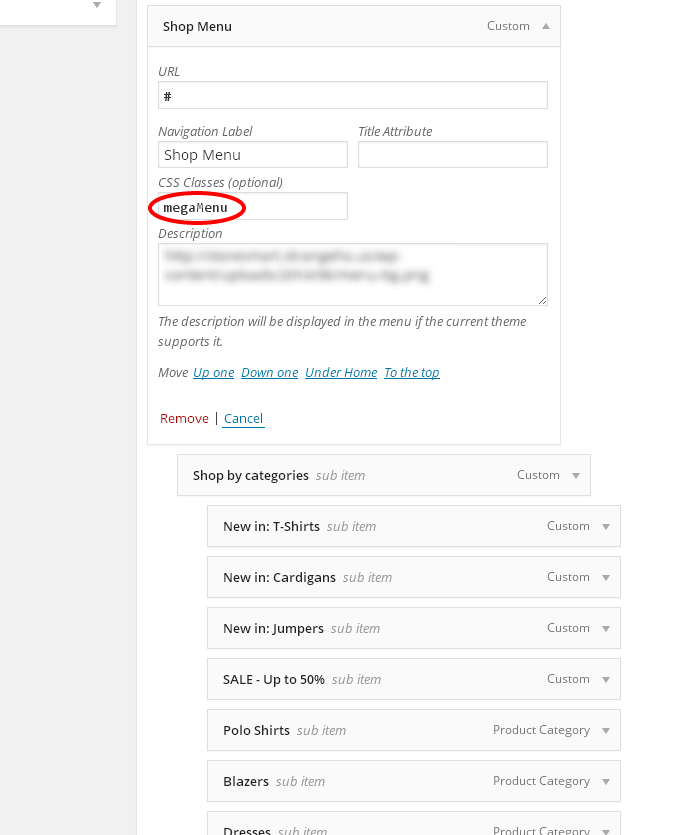
Creating multi column menu ("Mega" menu)
You need to add megaMenu to "CSS Class" field of first level menu item.
Customizing multi column menu

#1 Mega menu background image
1) Make sure that "Description" field of menu items is visible:

2) Fill the "Description" field of top level item (with css class megaMenu) with the link to image source.
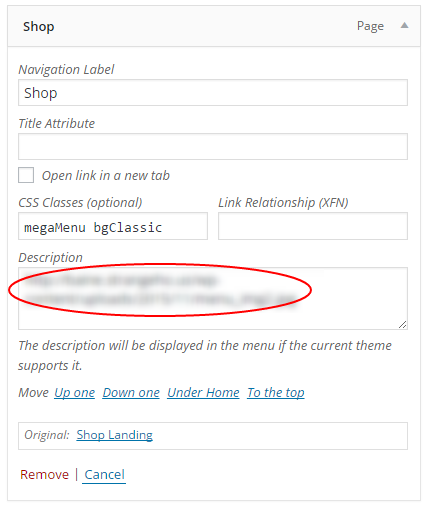
Also you can set background image position (by default it will appear at the left-top corner). Add to "CSS Class" field one of the next values:
- bgLeftBottom
- bgLeftTop
- bgLeftCenter
- bgRightBottom
- bgRightTop
- bgRightCenter
- bgCenterBottom
- bgCenterTop
- bgMiddle
Background image size. bgFit - image fits container. bgCover - image covers container.
- bgFit
- bgCover
Also we provide class bgClassic - background image fits container and appears in the right bottom corner.
#2 Link Icon
Navigate to page.
Choose (Click on) desirable icon.
Copy icon tag
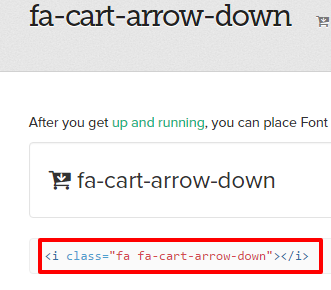
Add icon tag to the "Navigation Label" field.

Translation / Internationalization / Localization
For translating theme text strings you can use Wordpress or desktop tool like . To customize translations of WooCommerce plugin specific pages please follow refrence.
Getting Started with Loco Translate
First you need to install the plugin.
To translate a theme into your language, follow these steps:
- Create the global languages directory at
wp-content/languages/themes - Ensure this directory writeable by the web server
- Find the theme in the list at Loco Translate > Manage Translations
- Click
+ New languageand follow the on-screen prompts.
Important: Step 2 above is critical if you don’t want to lose your translations when your theme is updated. Translation files saved inside theme directories will be deleted by WordPress auto-update. The global languages directory is safe, but must be writeable by your web server for Loco Translate to save files in it.
To translate your own theme or plugin for distribution, follow these steps:
- Create a
languagessubdirectory in your plugin or theme's root directory - Ensure this directory writeable by the web server
- Find the theme or plugin in the list at Loco Translate > Manage Translations
- Click
+ New languageand follow the on-screen prompts.
More information on using the plugin is . Beginner's guide can be find .
Getting Started with poEdit
Download and install poEdit
Go to amory/languages/amory.pot
The poEdit screen
Open the file in poEdit.
The box labeled(1) is the original message (in English) from the POT file. The box labeled (2) is where you add your translation. Boxes labeled (3) and (4) are used for adding comments about the messages.
These come in handy if you are working with a team of translators and would like to pass around ideas through the PO file.
Go to File → Save as… to save your translations in a PO file.
When you are finished translating, go to File → Save as… again to generate the MO file.
Or you can set your poEdit to always compile a MO file when saving changes by clicking File → Preferences and on the Editor tab check the Automatically compile .mo file on save box.
Where to place your translation files
theme folder/languages/language_COUNTRY.po (e.g. nl_NL.po for dutch)
theme folder/languages/language_COUNTRY.mo (e.g. nl_NL.mo for dutch)
For multilingual support you can use (our theme is fully compatible with the plugin) or other multilingual plugins.
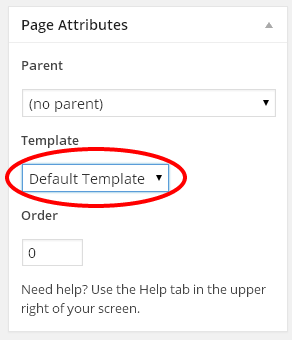
Full Width Page and Default Template
Here is a list of page templates that are included:
Default Template
Default page template with limited width.
Full Width Page
100% width template. For pages with content that goes all the way to screen edges.
To change default page template you need to set it inside "Page Attributes" section on "Edit Page" screeen.
Theme Modifications
If you need to add custom css or custom javascript code - from admin Dashboard navigate to Theme Options → Common.
For file modifications you need to use "child" theme.
You need to use "child" theme to make theme modifications and retain the ability to apply updates of the "parent" theme.
Upload and activate amory child theme (the process is similar to parent theme installation). See amory-child.zip or amory-child folder (unzipped) inside theme package.
Do not edit parent theme files. Edit only "child" theme files.
Related Articles
How to update the theme?
The easiest and safest way is to update through the Envato Toolkit plugin that comes packed with the theme.
In your WordPress admin dashboard you should see a section called Envato Toolkit. You need to connect your ThemeForest account to it and once you have done so, you’ll see here all available updates, always at one click away.
1. Navigate to the Envato Toolkit section in your WordPress admin.
2. To connect your ThemeForest account you'll need to enter the username in the "Maketplace Username" field and a input a Secret API Key.
3. The Secret API Key can be generate in your ThemeForest account, in the Settings > API Keys section:
4. Label it and click the "Generate API Key".
5. Copy the API Key and go back to your WordPress admin panel, to paste it.
6. Now that you've connected your ThemeForest account to your site, notice a 2nd tab called "Themes", you'll always be able to come here to update the theme.
7. Click the "update automatically" link and your theme will update to the latest version.
Content Editor / WYSIWYG Editor
Custom Content Editor Elements
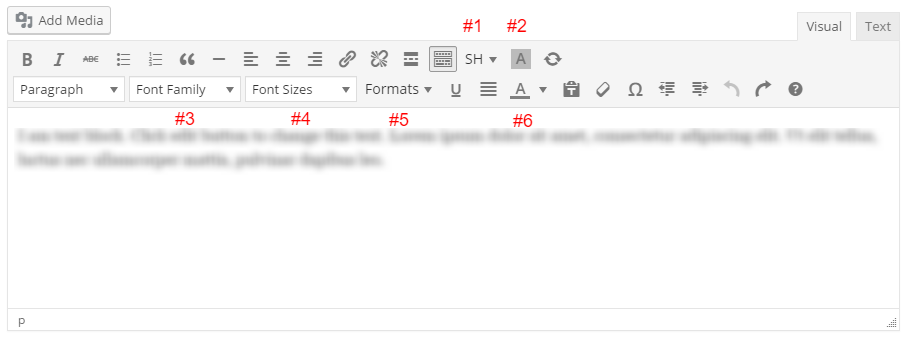
- SH (Extra shortcodes dropdown)
- Background color switcher (You can switch content editor background color to black. e.g. text color have to be white. White text on white background can't be seen.)
- Font Family
- Font Sizes
- Formats (Line Height, Font Weight, Uppercase)
- Font Color
☀ Note: to show extended number of tools you need to click Toolbar Toggle (above #1) button.
☀ Note: first you need to select text you wish to apply custom style (Font Family, Font Size etc.).
Shortcodes
Simple Grid Shortcode
Icon Shortcode
[sh-icon url="" class=""]
Displays icon with link.
| url | Url | Empty string | Link url |
| class | css class | Empty string | A name of a classification, or list of names of classifications, to which the element belongs. e.g. class like: fa fa-facebook |
| Name | Value | Default value | Description |
|---|
Sample
[sh-icon url="" class="fa fa-facebook-official"]
Bundled Plugins Documentation
Shop
Shop Setup Complete Guide
Category Extended Management Options
From admin Dashboard navigate to Products → Categories → Edit (hover over desired category name)
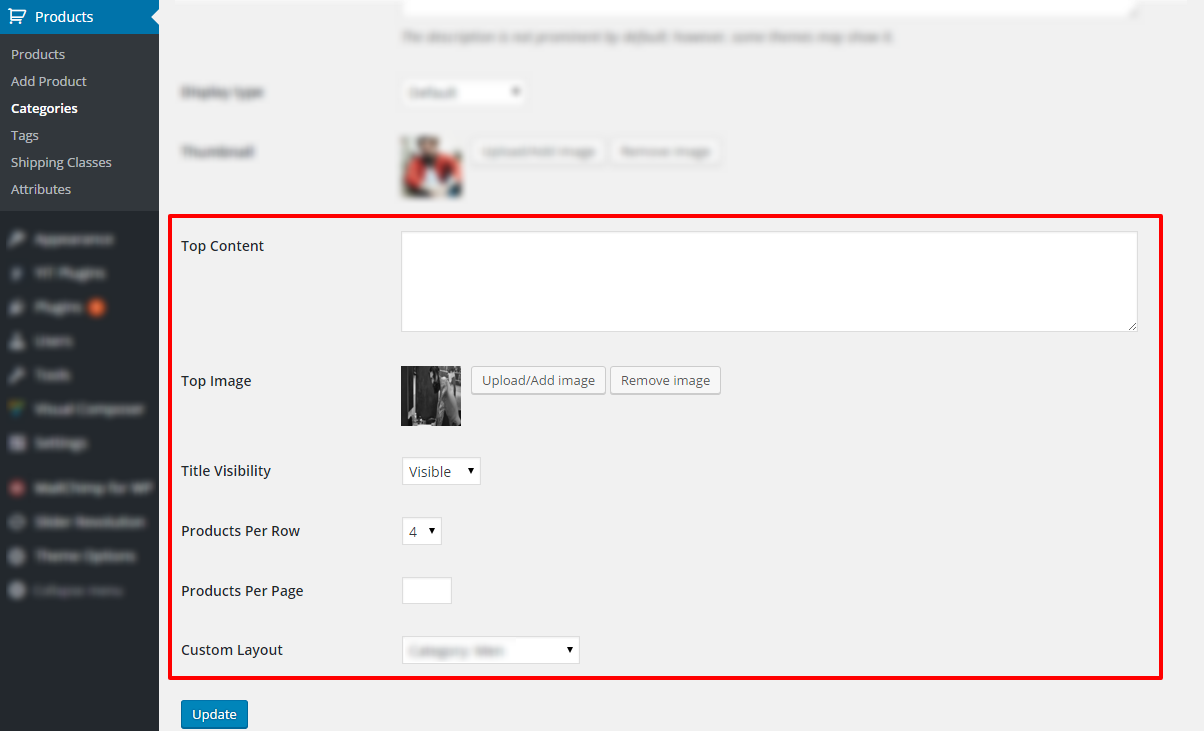
Top Content
The content that will be shown at the top of the page.
Top Image
The image (with parallax effect) that will be shown at the top of the page.
Title Visibility
Show/Hide category title.
Products Per Row
Number of products per each row.
Products Per Page
Number of products to show page by page.
Custom Layout
Ability to apply Custom Layout.
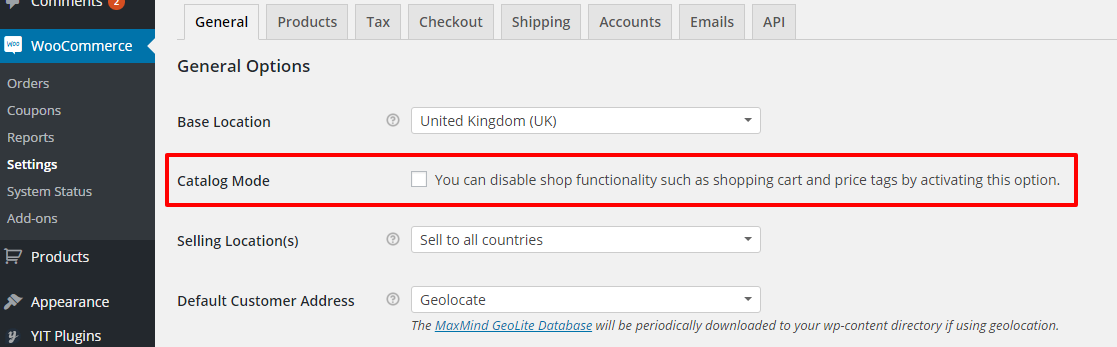
Extended Settings / Catalog Mode
You can disable woocommerce shop functionality such as shopping cart and price tags.
To activate "Catalog Mode" navigate to WooCommerce → Settings → General from your Dashboard.
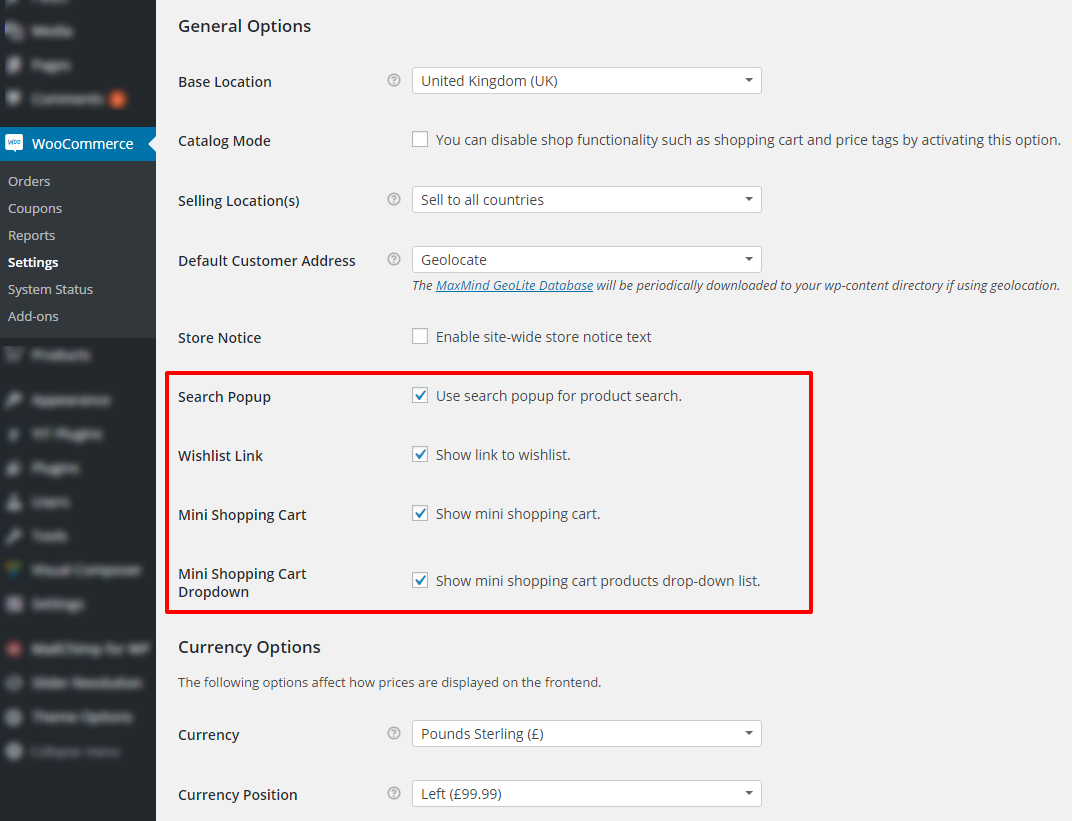
Extended Settings / Header Shop Elements
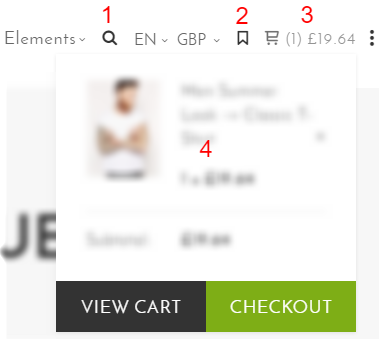
1. Search Popup
Use search popup only for product search.
2. Wishlist Link
Show link to wishlist.
3. Mini Shopping Cart
Show mini shopping cart.
4. Mini Shopping Cart Dropdown
Show mini shopping cart products drop-down list.
From admin Dashboard navigate to WooCommerce → Settings → Products → Display
Extended Settings / Shop Page
From admin Dashboard navigate to WooCommerce → Settings → Products → Display
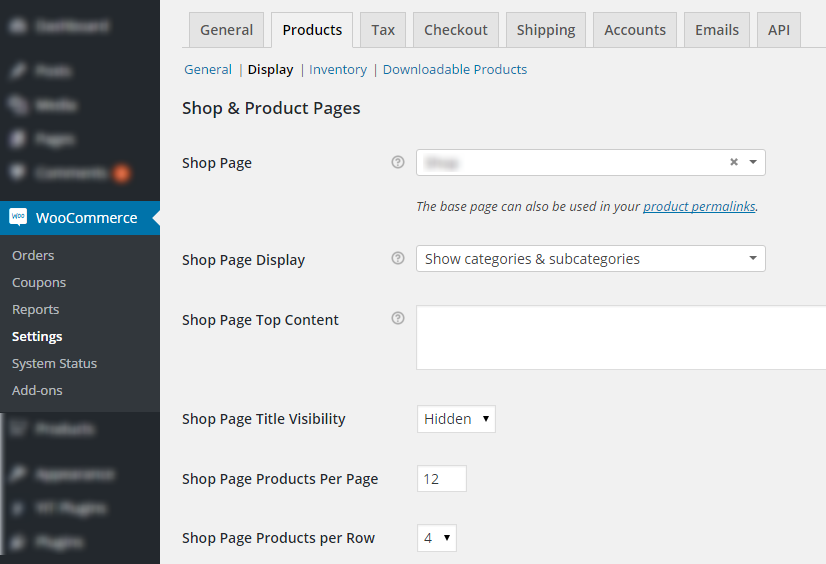
Shop Page
Set static Page as WooCommerce default Shop landing page.
Shop Page Display
This controls what is shown on the product archive.
Shop Page Top Content
Content that will be shown on top of the page.
Shop Page Title Visibility
Show/Hide shop page title.
Shop Page Products Per Page
Number of products to show page by page.
Shop Page Products per Row
Number of products per each row.
Extended Settings / Product Tags
From admin Dashboard navigate to WooCommerce → Settings → Products → Display

Tag Layout
You can apply Custom Layout to product tag page. How to create Custom Layout?
Tag Products Per Page
Number of products to show page by page.
Tag Products per Row
Number of products per each row.
Related Articles
Extended Settings / Miscellaneous
From admin Dashboard navigate to WooCommerce → Settings → Products → Display
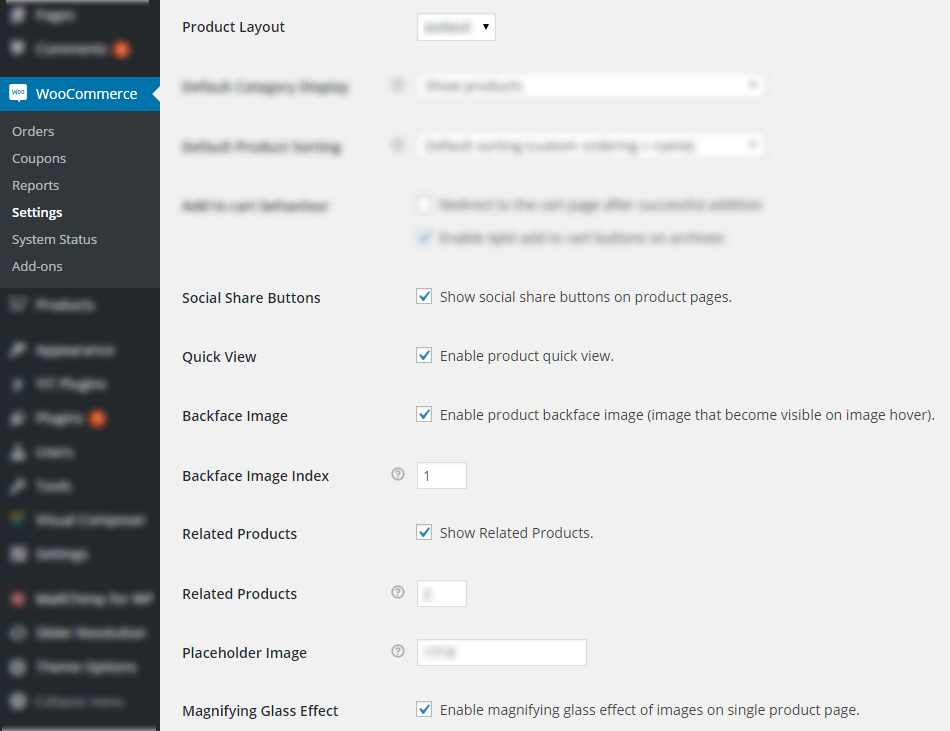
Product Layout
Default custom page layout for single product pages. Can be overwriten on edit product page.
Social Share Buttons
Show social share buttons on product pages.

Quick View
Enable product quick view.
Backface Image
Enable product backface image (image that become visible on image hover).
Backface Image Index
Backface image index number (from product gallery).
Related Products
Show related products on single product page.
Number Related Products
Number of related products.
Placeholder Image
Placeholder image attachment id. It is shown when product image is not specified.
Magnifying Glass
Effect Enable magnifying glass effect of images on single product page.
Visual Page Builder
How to Display Templates?
- Copy template name.
- Click templates icon (top left corner).
- Fill search input with template name.
- Find the template and click plus to insert it.

Related Articles
Templates List
Features Grid / Template
Template Name: SH: Features Grid
Section with Background Video / Template
Template Name: SH: Section with Background Video
50/50 Promotion Section / Template
Template Name: SH: 50/50 Promotion Section
50/50 Progress Section / Template
Template Name: SH: 50/50 Progress Section
Testimonials Carousel / Template
Template Name: SH: Testimonials Carousel
Features Section / Template
Template Name: SH: Features Section
Pricing Table / Template
Template Name: SH: Pricing Table
Pricing Table / Template
Template Name: SH: Pricing Table
60/40 Promotion Section / Template
Template Name: SH: 60/40 Promotion Section
40/60 Products Promotion Section / Template
Template Name: SH: 40/60 Products Promotion Section
Parallax Promotion Section / Template
Template Name: SH: Parallax Promotion Section
Team Bio / Template
Template Name: SH: Team Bio
Contact Form Section / Template
Template Name: SH: Contact Form Section
Elements
How to Display Elements?

Related Articles
Elements List
Row / Element
Container for content elements.
How to limit it width?
You can apply with name SH: Limited Width. Alternatively you can add sh-row to element setting "Extra class name".
Live Type / Element
Displays text element with typing animation.
Product Category Block / Element
Displays element displays block with link image and title of specific WooCommerce category.
Category Image / Element
Category images should be set within wooCoommerce category.
- From admin Dashboard navigate to Products → Categories → Edit (hover over desired category name).
- Set category Thumbnail image.
Custom Link Block / Element
Displays link element with custom hover animation.
Click Section / Element
Displays content element with custom hover animation.
Product Showcase Slider / Element
Displays vertical slider with WooCommerce products.
Product Carousel Slider / Element
Displays animated carousel with WooCommerce products.
Counter / Element
Displays animated counter element.
Countdown / Element
Displays animated countdown clock on your page.
Dribbble Feed / Element
Displays gallery of images from specified Dribbble account.
- Go to page.
- Enter all of the information (For "callback URL" you can just enter your domain name).
- Click "Register application" button.
- Find and copy the "Client Access Token".
- From admin Dashboard navigate to Theme Options → Common.
- Paste "Dribbble Access Token"
Instagram Feed / Element
Displays gallery of images from specified Instagram account.
Slider / Element
Displays animated carousel with WooCommerce products.
Google Maps / Element
Displays Google Map element.
How to setup?
- Visit .
- Find your location.
- Click the menu ("hamburger" icon) symbol in the left top corner and select "Share or embed map".
- On modal window select "Embed map".
- Copy iframe code and paste it to "Map embed iframe" field.
You can also generate theme specific (demo style) map:
- Visit page.
- Paste basic map iframe.
- Generate custom map iframe, copy and paste it to "Map embed iframe" field.